Simple Blocks are built of simple track elements (not to be confused with other track objects like switches) linked to other track objects, one on the left and another on the right. Trains travel from one end to the other.
Except for connector-only blocks there is speed limit, which can be different for each direction, and a station may be assigned.
In Run mode, only the portion left of the red separation line of this panel is displayed. In Edit mode, the whole panel is displayed.
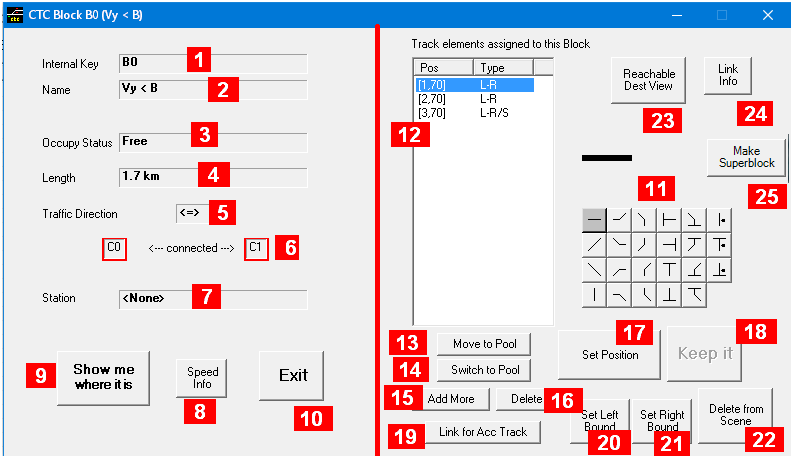 Fields common in both modes:
-
Internal Key: a unique non-modifiable identifier provided by the system.
-
Name: an optional identifier. Editable in edit mode.
-
Occupy Status: whether the block is free, inroute (left or right), occupied, in maintenance, admin blocked (display only)
-
Length from one end to the other
-
Traffic Direction: The direction trains can normally travel. Can be overridden manually, not relevant for switching moves. Field shows “****” for connector-only blocks
-
A graphic showing the block where each end shows the internal key of the element it is connected to – clicking on it will open a window showing the details for that particular element. In Edit mode, a right click will copy this link information into a link maintenance tool from which the connection can be manipulated.
-
Station on this block (“<none>” if there is none).
-
Speed Info: opens a separate window displaying the speed limit for each train type to obey (if two columns are shown, the first column is used for the direction from left to right, the second for right to left. If only one column is shown, the speed limit is used for either direction).
-
Show me where it is: activates the main window where a marker has been placed on the block for you to easy locate (hit <ESC> there to return)
-
Exit: closes this window.
In Edit mode you see also on the right half of the window:
-
A collection of graphics of all 23 possible available track element types, with the currently selected one highlighted. Clicking on one of them here will change the type and update all displays.
-
A list of all track elements assigned to this block, or a list of all track elements currently in the global pool. The line of one element show the grid position and the type, which is shown in the graphics if one is selected.
-
Move to/from Pool Moves currently selected track elements from block to pool and vice versa. It is possible to select more than one element for this move.
-
Switch to Pool/Block Changes the list of track elements to those currently in the global pool or the current block, respectively.
-
Add More Each click will add one more track element to the current list
-
Delete Deletes currently selected track elements from the current list.
-
Set Position: activates the main window with grid lines, where you can place this track element any free square grid element with a mouse click (hit <ESC> there when done to return). Note: as long as the grid lines appear on the main window, you can return to the main window and repeat the placement again. This will stay active until you hit the “Keep it” button, close this window, or you activate this feature for a different object or different track element, at which time the location of this track element will be settled. (1)
-
Keep it: the track element’s position is now fixed (removing the grid lines on the main window). Without it it can still be changed on the main windows even though you may have done other things. (1)
-
Link for Acc Track This will copy this link information for this block as such into a link maintenance tool from which the connection can be manipulated.
-
Set Left Bound The currently selected track element will be used as the left most track element to be included in the circle for the “Show me where” function
-
Set Right Bound The currently selected track element will be used as the right most track element to be included in the circle for the “Show me where” function.
-
Delete From Scene: Removes the entire block from the scene. Objects to which this block was connected to will have their linkage to this block removed, resulting to a null linkage there.
-
Reachable Dest View Opens a panel where you can view which stations or exits and be reached without changing the direction when leaving this block.
-
Link Info Opens a window which shows all linkages from this block including unused one.
-
Make Superblock or Split this block Converts this block to a superblock or split this block (2)
Note
-
For details see here.
-
If block is already in use, block can be split in two (see here), otherwise (if just created) block can be made a superblock. For complete instructions to build a superblock see here.
For details displayed for a Super block see