Signals convey information about the stretch of track ahead to the train driver. Signals can have also properties that can trigger certain functions when the head of the train passes that point. Signals work only one way – if you need a similar functionality in the opposite direction, you need to have another signal accordingly.
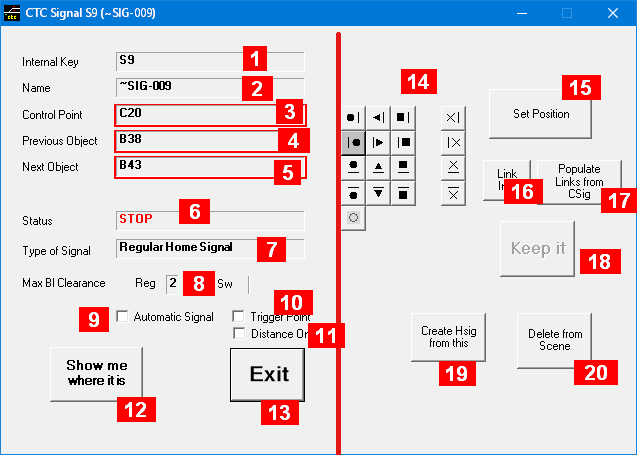
In Run mode, only the portion left of the red separation line of this panel is displayed. In Edit mode, the whole panel is displayed.
Fields common in both modes:
-
Internal Key: a unique non-modifiable identifier provided by the system.
-
Name: an optional identifier. Editable in edit mode.
-
Control Point: the track element where the signal is based on
-
Previous Object: the track element from which a train would approach the signal
-
Next Object: the track element a train enters when passing this signal
-
Status: Current Signal indication (display only)
-
Type of Signal
-
Max Block Clearance: The maximum number of blocks this signal can show as cleared ahead, “Reg” for Regular Routing, “Sw” for Switch Routing (if applicable)
-
Automatic Signal: Check to make this signal automatic (runtime mode only)
-
Trigger Point: Whether a trigger is assigned (display only in runtime mode) (1)
-
Distance Only: Whether this signal is distant only (display only in runtime mode)
-
Show me where it is: activates the main window where a marker has been placed on the block for you to easy locate (hit <ESC> there to return)
-
Exit: closes this window.
In Edit mode you see also on the right half of the window:
-
A collection of graphics of all 4 possible signal types, each in 4 different orientations, plus the end-of-track signal, with the current type highlighted. Clicking on one of them here will change the type and update all displays (cannot change to/from end-of-track type) (1)
-
Set Position: activates the main window with grid lines, where you can place this switch on any free square grid element with a mouse click (hit <ESC> there when done to return)
note: as long as the grid lines appear on the main window , you can return to the main window and repeat the placement again. This will stay active until you hit the “Keep it” button, close this window, or you activate this feature for a different object, at which time the location of this object will be settled. (1) -
Link Info Opens a window which shows all linkages from this block including unused one.
-
Populate Links from Csig
-
Keep it: the switch’s position is now fixed (removing the grid lines on the main window). Without it it can still be changed on the main windows even though you may have done other things.(1)
-
Create Hsig from this/Create Sig from this (2) Makes signal hidden or visible
-
Delete From Scene: Removes this signal from the scene.
Notes:
-
Not present for Hidden Signals
-
This transfers data to a new object, replacing the current object – and closes this window. Hidden signals don’t have an orientation nor a location on the scene diagram